What Did You 3D Print Today?

Did you happen to check if it increased the print time? Pretty cool though, thanks for the tip

Only 20 more minutes.
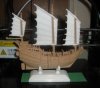
Printer: Ender 3
Slicer: Cura 3.4.1
Model Size: 100%
Support: Yes. Touching buildplate only.
Build Plate Adhesion: Skirt.
With Fuzzy Skin...….. 3h 41min.
Withpout………………. 3h 20min.
 
Last edited:
The Rubbles...…. Barney, Betty and BamBam

The Rubbles..... Barney, Betty and BamBam.jpg

Barney's scale is out of wack. I'll print one of bigger size later. Right now I am on a Radial Piston Engine model.
 
8 Cylinders Radial Piston Engine

Parts printed, to be assembled
Engine(1).jpg

Assembled model. All pistons move manually by turning the handle at the other side of the engine block
Engine(2).jpg

Engine(3).jpg
 
The reunion..... the Flintstones and the Rubbles

Flintstones and Rubbles.jpg

P.S. Barney is a new print. Last one was too small. And now, Betty looks too petite and Wilma too tall. Oh well.
 
Last edited:
Harley Davidson Evolution Engine

There are parts missing and fitting is not good. I did a lot of filing and sanding accompanied by crescendos of swearing.
I guess I was spoiled by the precision fittings of model car kits.

Front view
Harley Davidson Engine(1).jpg

Back view
Harley Davidson Engine(2).jpg
 
Last edited:
Chinese sail boat

No painting applied.

Boat :
Material...…...…...….Wood by Hatchbox 1.75mm PLA
Sails & Base...…….. White by Hatchbox 1.75mm PLA


Bao-chuan(1).jpg Bao-chuan(2).jpg


Bao-chuan(3).jpg Bao-chuan(4).jpg
 

Attachments

  • Bao-chuan(1).jpg
    Bao-chuan(1).jpg
    111.9 KB · Views: 1
Last edited:
One of those "mind teasing" models.

This one has 6 rings which are printed from one gcode file. They move independently and yet maintain as one unit.

4 Gears(1).jpg

4 Gears(2).jpg
 
Last edited:
Spiderman


The fitting was atrocious. The body consists of 3 parts. 1 part to be in red and 2 parts to be in blue. Boots and base are separate parts.
When putting the body parts together, there was a 1/32" gap along the seams. Had to cover it with polyfill before I could hand paint it.
Spent 2 hours printing the base and turned out to be incompatible. Useless. Had to improvise by printing a circular base for it.

Spiderman(1).jpg

Spiderman(2).jpg
 
Last edited:
Came out good looking but always sucks when feels like almost done and find out some pretty big errors like that in the model/export. Had similar problems with one of the ed-209 models had to scale some things to fit properly and still ended up redoing the top leg parts cause the original ones were too fragile at the scale I used.
 
Captain America

It is safe to say that he is having a very very very bad day?

Captain America(1).jpg


Captain America(2).jpg

Captain America(3).jpg


P.S. The base is from Spiderman stl file. I use it for this model with a little improvisation. Why? Because the base meant for this model consists of 2 parts, each part requires 7hrs.+ to print. 15 hours just for the base? Nuts!
 
Last edited:
Only I could have done that...….

I have been printing a "man of war" type of war ship. So, I had all 15 parts of the ship's body printed. I glue them together, poly-filled the gaps, and painted it.
Only then I realized I forgot about the canyons. All 34 of them!!! This warship is not going to scare any pirates, I'm afraid.
Well! Start over again.
What a dummy. Guess I can't claim myself "a stable genius" anymore.

Warship(1), unfinished.jpg
 
IMG_20200622_143940_copy_2016x1512.jpg
A buddy of mine found a fixed wing in the woods where he works and I got it to bind up and it sort of almost flies. Long story short I had to print some parts for it but now trying to design and build my own plane (I have no idea what I'm doing so this should be interesting). Learning from ecalc.ch as usual and looking at other people's designs for inspiration buy just winging it (pun totally intended)
 
In hindsight I should have had the support ribs go through the cylinders that are meant to hold rods to put the wings on the fuselage but learning as I go here.
 
The warship hull makes up of 3 decks...… bottom, middle and upper.
As luck would have it, 2 of the 3 parts of the upper deck came unglued. That exposed the middle deck. So, now I could put in the cannons to the middle deck. All 14 of them.
Bottom deck is glued tight, no chance for its 14 cannons.
I decided to finish the model instead of starting over.
So the ship is missing 14 cannons. I can always dream up a reason for it, however stupid it might sound. Learnt it from the guy in 1600 Pennsylvania Ave.
That reminds me. Have to make an appointment with my doctor for a Kung-Flu shot!


Warship(1).jpg

Warship(2).jpg

Warship(3).jpg

Warship(4).jpg
 
Last edited:
The multicolor is pretty sweet one day might add some multimaterial stuff.

Recently been doing work on my diy machine to take full advantage of the rails to get biggest possible build volume and just tighten up the quality but now need to adjust my partially 3d printed shelving solution. Going to make it shorter which will make it more stable and just wider.... Will make sense in a few days when I get it done.

IMG_20200722_103449_copy_1512x2016.jpg

IMG_20200724_140503_copy_1512x2016.jpg

IMG_20200724_140522_copy_1512x2016.jpg

IMG_20200720_093801_copy_1512x2016.jpg
 
Back
Top