What Did You 3D Print Today?

I am not that "skillful" to "antigue" a model.
Speaking of airbrush, I bought one at least 10 years ago when I was into model car hobby. But I never use it. Too messy and to much work such as mixing the colours, cleaning up afterwards.
I settled for cans of spray paints and hand paining when needed.

 
I have had a few prints waiting to be painted.
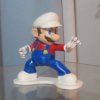
Fred Flinstone was one of them. Now here is the Super Mario......

Super Mario(1).jpg

Super Mario(2).jpg

P.S. I forget to paint a darker blue circles at the center of the eyes. Will do that later.
 
Really awesome how far some paint in the right hands goes :D

Curious what you're making these for, table top games? or just something to pass the time and "meditate".
 
Really awesome how far some paint in the right hands goes :D

Curious what you're making these for, table top games? or just something to pass the time and "meditate".

Thank you.
I have heard of the term "tabletop games", but I don't really know exactly what that means. Something like an "old" bugger I saw on TV setting up British toy soldiers on one side and Napoleon French toy soldiers on the other side of a table?

I printed the minis just for fun as it was the first time I ever attempted to print "tiny, weeny" models. I had no idea how my printers would perform.


Oh. P.S. The last print above was painted solely with acrylic paints which were the cheap ones I bought from Walmart many months (maybe years) ago.
So, I was wrong about acrylic paints. If I want more "shine", I can always apply a layer or 2 of clear coats.
 
Last edited:
T-Rex skeleton

Not an enjoyable endeavour.
1. Did it in 100% scale,.
2. Each part took forever.
3. Some parts were hard to get printed properly, i.e. the left and right Ribs. Some of the rib pieces came out crooked or partially printed. Some just simply broke off. I had tried Support/Everything, Support/Touching, Tree Support, Rim, Raft on all Support options. Mostly touch and go.
It could be my filament quality. I paid at least $30 on anyone of them. They weren't supposed to be cheap products.
I did the Rib cages 4 times before I had a pair that are fairly acceptable. Even the "back" base gave me issue.
Any how, it's done...…..

T-Rex(1).jpg

T-Rex(2).jpg

T-Rex(3).jpg
 
Last edited:
This is my print of a Harley from thingiverse, day and a half to print all pieces model is about 16" X 9" and about 12 individual pieces.
A fun project.
ctdigger

!2 individual pieces ?
Sure it is not 41 pieces?
I was there, downloaded it, and found 41 pieces needed to print.
 
davidk129
you are correct on the number of pcs but if you look closer you don't need ALL those pcs to make the Harley. there are some pcs that are complete like the frame, wheels, springer front end, tank, engine, transmission etc. The rest are pcs you print and glue together to make the frame, wheels etc for quicker print times.
ctdigger actually 28 pcs to make the bike, sorry for the 12
 
Last edited:
Wow! I've been wanting to do the terminator arm but it's a similar number of parts (I think smaller though?). Anyway complexity of the print just reminded me of that, awesome work!
 
Oh also in the what did I print category

IMG_20200420_214154_copy_2016x1512.jpg
IMG_20200420_150449_copy_2016x1512.jpg
The silver parts for runcam mounting and gold boxes for esp32 based camera dev boards (internet connected low power security cam).
 
davidk129
you are correct on the number of pcs but if you look closer you don't need ALL those pcs to make the Harley. there are some pcs that are complete like the frame, wheels, springer front end, tank, engine, transmission etc. The rest are pcs you print and glue together to make the frame, wheels etc for quicker print times.
ctdigger actually 28 pcs to make the bike, sorry for the 12

Ok. 28 pieces? I can handle that..... I think.
 
This is my print of a Harley from thingiverse, day and a half to print all pieces model is about 16" X 9" and about 12 individual pieces.
A fun project.
ctdigger

I am wondering...…. were you using a Resin Printer for this Harley?
 
Last edited:
Back
Top