So, here's the plan...

Hi all,

I'm new here and trying to get as much advice from as many different places as I can!

I've flown helis in the past (I currently own a Blade MSRx and I'm in the process of fixing up a TRex 450 clone) however I really want to make the move to multi-rotor as I'm interested in eventually doing FPV (that was part of the plan with the 450 but it's going to take quite a while to make it airworthy!)

At the moment, I'm working to a budget and I need to buy the parts on Amazon as I was given around £90 of AMZ gift vouchers on leaving my last employer.

My current parts list looks as follows:

NEEWER X-Frame
Andoer 4 x A2212 1000KV Outrunner Motor + ESCs and props
QQ Super Flight Controller
OrangeRX RX100 Satelite

Am I missing anything obvious? The only thing I could think of was that the power from the battery might need a distribution board of some sort.

Also, I'm currently working with 3s 2200MAh LiPo's for the 450, would I need to upgrade to 4s or 6s for this kind of setup?

I am well aware that this won't do any acrobatics, nor will it have anything fancy such as "return to base" or GPS navigation, however at the moment that doesn't matter as when I can afford to upgrade to a MultiWii Board or similar I'll swap out the QQ Super.

All and any advice welcome,

Thanks in advance,

Matt
 
hi Mat and welcome, as for FCB i would go for this one
http://www.amazon.co.uk/K2-1-5-Mult...e=UTF8&qid=1416248398&sr=8-2&keywords=kk2.1.5
this fcb is very stable in acro and stable mode will also run a camera gimbal if you want later , and the big one is lots of us have used and know how to set up ,so if you get the less used fcb means less help if you need it , will run on a sat receiver as well
i cant find weight on the frame but i dont think it will be much more than the flame wheel 250grms with the motors and props with a 2200 mah battery you should be looking at about 10 mins my boy gets 15 mins using shame motors prop combo and a 450 flame wheel frame
Be careful of plastic props they snap in flight so get on to slow fly apc carbon props as soon as you can the quad will fly much nicer as well
As you want to keep cost down make your own loom up its cheaper as long as you have a soldering iron
add to list heat shrink , blue lock tight ( small bottle)
To keep weight down i would solder esc to motor wires and not use connectors ( you may have to buy some wire but i think frame is small enough to be ok as it comes
The ESC will need to be set up so turn off brake on the escs ( i would do each one on its own so you know they are all set up the same inc throttle set up)
I dont want to swamp you with info once you get it then we can help you set up but in all your list FCB is the only thing i would change
 
Thanks Neil, that's incredibly useful.

I'm reading up on the KK board tonight and I think I've found one for just a fiver more than the Thunder QQ - is this the same? http://www.amazon.co.uk/gp/product/...act_title_1?ie=UTF8&psc=1&smid=A2RM5DXCL4T1T3

Thanks for the info on the batteries. I've got two 3s LiPo's for use with the 450 Heli so to know that I'll get around 20-30 minutes flight time out of them is really cool.

If the above controller board *is* the same as the one you linked too (and I suspect that it is!) then I'll have the entire setup to get started for £96! :D

Cheers,

Matt
 
Hi Mat yes it the right kk board , the firmware it comes with is ok but can be flashed with a much more stable Steveis code , but see how you get on with it
 
Awesome, thanks.

I'm going to take the OrangeRX 615 I've currently got in my Heli and use it with this first as apparently you need a converter cable to use the satellite (and it also brings the price down to £83!) but I'll order the parts today and see how I get on!

Cheers,

Matt
 
Thanks for the link Matt.. looks like you are on the same path as me.. and the same budget :-/

I am looking at several controllers.. I keep coming back to the KK2.1.5 but its elusively out of stock.. I am patient..

I am also interested in thoughts on a few controllers
this version of the KK2.1.5
the CC3D (with and without barometer and compass)
Naza 32 (+) (or was this one with and without barometer?)
and then maybe save my pennies and get the CC3D's big brother, the Revolution??

I have set my sites on RTF by April 2015 so waiting and spending a little more is an option...
I like the screen on the KK2.1.5 but I am not apposed to dragging a PC in the field

so as not to be a PITA taking over Matt's thread please post thoughts over here
 
Hi Bill,

Great to see you over here and thanks for not HiJacking the thread! :D

I'm waiting on my KK 2.1.5 to arrive (it's been shipped from China, should be here anytime between next Thursday and Christmas apparently :( ) however the frame arrived yesterday and my eldest daughter helped me assemble it.

It was incredibly easy to do (once I'd found the correct size Allen Key!) and it went from

20141120_145405.jpg


to

20141120_153320.jpg


In the space of about 30 or 30 minutes (might well have been quicker without the lessons on torque and over-tightening that went with it for my daughter!)

The airframe seems incredibly stable, now I just need the rest of the kit to make it fly!

Cheers,

Matt
 
Hi Mat nice looking frame i see there are mount holes for FCB so you can use just about any one you want , it looks a bit like a dead cat type frame , are all the motors the same distance from each other
 
ESCs, Motors and blades arrived today.

I've asked the vendor for more details on the ESCs as the manual is entirely in Chinese and I have no idea what it means!

I'm hoping I can flash them with the SimonK firmware as I've heard good things about it in relation to stability etc, however if I can't then I'll just go with what I've got.

Hopefully I'll get a few hours in the next couple of days to solder all this together, then I'm waiting for the FCB to arrive... :)

Cheers,

Matt
 
So, for those of you not following my blog at https://droneonabudget.wordpress.com/ (and why aren't you?! ;) ) here's what I've managed to get done this week after the propellers/motors/escs arrived:

====== BEGIN UPDATE ======

This week, the motors, propellers and ESCs to control them arrived in the post.

A single set looks like this:


Although they actually come with two propellers in each kit, which is a bonus! :)

The eagle eyed amongst you may have noticed that they don’t have any connectors soldered to the ends of the leads as well. This isn’t an issue for the battery leads that will be soldered to the distribution board, however it does pose an issue for the motor connectors etc.

You can see this in better detail below, where I’ve connected the propeller to the motor:


I did consider soldering the ESCs direct to the motors, then I realised that I have no polarity markings on my ESC leads so I would need to solder, de-solder and re-solder until I got it correct.

That’s when I popped down to the local car spares shop and purchased twelve sets (three for each motor, four motors remember!) of bullet connectors:


Unfortunately, when I went to wire them up they turned out to be the wrong size, so it looks like I will have to go to Antics this week after all.

Not to be deterred, I decided to attach the motors to the frame anyway. To do this, take the bolts provided with the frame and attach the motor directly to the frame in the correct positions. DO NOT USE THE METAL BRACKETS PROVIDED WITH THE MOTORS – THEY WILL NOT FIT THE FRAME!


Once all four motors are in place, your frame should look like this:


(Yes, I put blades onto one of the rotors just because I can! :) )

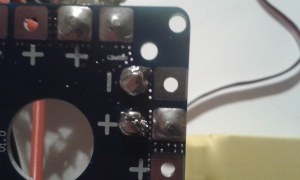
I then decided to move on to my power distribution board. This proved more complicated than I thought until I realised that I was just doing it wrong.

Take this:


Solder one end of the red and black wires to the two “inner” connections (red -> +ve, black -> -ve).

Slide the heat-shrink sleeves over the relevant wires and let it rest at the bottom on top of the circuit board.

Now tin the other ends of the wires, tin the soldering iron and tin both connectors on the Deans XT connector. THE RED WIRE GOES TO THE FATTER, FLATTER CONNECTOR, THE BLACK TO THE “VERTICAL” CONNECTOR – THIS IS IMPORTANT. THINGS WILL GO BANG IF YOU GET THIS WRONG!

Offer up the tinned wires to the connector and use more solder to complete the join.

Pull the heat-shrink up and over the newly soldered deans connectors and use a lighter to shrink it around the wire and connector:


Take the first ESC and carefully push the exposed wire through the appropriate hole on the PDB. You can see in the pictures below that I’ve used some “helping hands” to hold the board and the wires in place whilst I solder them


I found that the best way to solder the joint was to use the side of the soldering iron to heat the wire and the pad on the PDB and then fuse the two together with the solder. I also made sure to completely cover the end of the wire, leaving me with small rectangles of solder over the pads with a slight bump in the middle where the wire was inserted into the hole.

I

Once you have soldered all four ESCs to the PDB, you should have something that looks like this:


Turn the board over and check that all the red wires are connected to the “+” terminals and the black wires are connected to the “-” terminals. As I said yesterday, get this wrong and things will go bang!


Once you’ve got all four ESCs connected, we start to get into exciting territory!

Using the 30A connectors as a temporary connection between the ESCs and one of the motors, I then wired up the rest of the components:


If everything is wired up correctly, then you should see a stable orange light on the receiver to show that it is bound to the transmitter.


If you get this far, well done! You can now SLOWLY AND WITH THE BLADES REMOVED FROM THE MOTORS increase the throttle, you should be rewarded with the motor starting to spin:


Next up, the Flight Control Board (when it arrives in the post!), connecting the motors to the ESCs properly and the maiden flight!

===== UPDATE ENDS =====

Now, a question on the KK 2.1.5 (when it arrives!) - do I need to care about which way around the motors rotate once attached to the ESCs *before* I attach the KK FCB? I know that two of the motors need to go clockwise and the other two need to go anti-clockwise, but I'm not sure if this directional control is done inside the KK FCB or whether I need to flip the connectors to the motor to make it go backwards!

Thanks in advance,

Matt
 
Last edited:
Hi mate yes the motors need to spin right way round its controlled by the ESC the kk will show you motor lay out once you tell it what your flying ,the motors need to be , front left cw, front right ccw, back right cw back left ccw once you have them spinning right way soilder wire together will save you having a connection fail in flight and will reduce over all flight weight
 
Thanks.

Antics didn't have the connectors I was after so I just went and bought some heat-shrink instead! :)

I'll give the soldering a go tomorrow night. Still no sign of the KK :(
 
I just did my 700 quad by soldering the wire , as i had 2 gold plugs let me down in flight snapping the arm in the crash , are you going to flash the kk when you get it
You can set up the motors with out the kk just plug then in to receiver one at a time on the throttle channel also do throttle range set up on ESC as you set up motor to spin the right way
Alot of the guys remove the red wire from the ESC on motors 2,3,4
 
Programming the ESCs is something I've not thought about yet but I guess it will need to be done - now I just need an English translation of the Chinese manual!

The KK is running 2.1.5 firmware as far as I know, is there a newer version that I should be flashing, and if so, what are the benefits of doing so?

Why do people remove the red wire from the ESC (assuming you mean the one to the RX, not the one to the motor!)?

Cheers,

Matt
 
Hi Mat the kk firmware is not that good i dont know what went wrong with it used to be good , there is a very stable one its Steveis v1.18s1 pro i use this one and its very stable , lots of guys remove the power from the plug on the motor end that plug in to the board as you dont need them , and they can give you power problems on some boards , i have not had any problems on my kk 2.1.5 and all cables are as they came ,wait till the board comes then plug in all the motors , tell the board its a X quad or + quad once this is done turn on transmitter put throttle to full then while holding down buttons 1 and 4 on the kk board get some one to plug in the battery, the escs will bleep then put throttle to zero and they will bleep again , thats it all esc now calibrated
 
Looks like you will have flight pics in no time ProfFalcen... I am still waiting on parts.. the little things like purple thread lock o_O
 
FCB arrived today, I've connected it all up and attempted to maiden it but managed to break a pair of blades in the process as it tipped forward.

Any ideas what I'm doing wrong?

I know that with my Heli I need a slight right-rudder to counter ground effect on takeoff, are quads the same?
 
Hi mate sound like the motors are back to front recheck ,unplug all but motor 1 ,arm and spin up motor one should spin , then plug in motor 2 , do the same again motors 1 and 2 should spin up do this till all motors are plugged in , once you calibrate the sensors on the kk with the quad level ,it should take off with no drift , if it does the same as the heli even after this there is an adjustment that can be done in the board , see how it goes first before we start changing things
 
Back
Top