davidhk129
Well-Known Member
Manual Z Offset adjust and bed leveling are pain in the butt with my Ender 3 basic stock model.
Finally I decided to upgrade. I chose Creality Ender 3 V3 KE.
Bed size : 220mm x 220mm x 240mm
There is a installation video from my Amazon listing.
It's child play. Almost everything is pre-installed. Just screw tight the gantry, the screen display and the filament holder. Electric plugs are no brainer. There is only one spot for each to plug in. Can't be more simpler.

This is a big change for me, from rock bottom model to lots of bells and whistles. Anyone wants to know more in detail, please google.
Here, I just list what I care most, personally.
Touch screen display.
CR Touch auto leveling.
Auto Z Offset calibration.
Sprite Direct Extruder.
Filament Auto Extruding and Retracting.
..........................................................................................
My one day experience using V3 KE printer.......
Each time it does auto bed leveling, it also does auto Z Offset. What a relief. The frustration of trying to do Z Offset adjustment is still vivid in mind.
By default, it will do auto leveling before each print. But it can be disabled/enabled.
It has maximum printing speed 500mm/s. Wow. I can do a print using only HALF the time needed than using Ender 3 stock model.
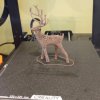
Screenshot below is a bird feeder house just finished.
It took 5h 54m to complete.
It would take 10h 49m using Ender 3.

Material : 1.75mm PLA filament.
Colour : Brown.
Slicer : Cura 4.9
Cura settings I am using :
Layer Height : 0.2mm
Infill Density : 20%
Printer Temp : 210 C
Bed Temp : 60 C
Printing Speed : 300mm/s
Inner Wall speed : 300mm/s
Outer wall speed : 200mm/s
Initial layer speed : 100mm/s
Top/Bottom speed : 200mm/s
Cooling : 100%
Retraction : 0.8mm at 40 mm/s
Support : NO
Finally I decided to upgrade. I chose Creality Ender 3 V3 KE.
Bed size : 220mm x 220mm x 240mm
There is a installation video from my Amazon listing.
It's child play. Almost everything is pre-installed. Just screw tight the gantry, the screen display and the filament holder. Electric plugs are no brainer. There is only one spot for each to plug in. Can't be more simpler.
This is a big change for me, from rock bottom model to lots of bells and whistles. Anyone wants to know more in detail, please google.
Here, I just list what I care most, personally.
Touch screen display.
CR Touch auto leveling.
Auto Z Offset calibration.
Sprite Direct Extruder.
Filament Auto Extruding and Retracting.
..........................................................................................
My one day experience using V3 KE printer.......
Each time it does auto bed leveling, it also does auto Z Offset. What a relief. The frustration of trying to do Z Offset adjustment is still vivid in mind.
By default, it will do auto leveling before each print. But it can be disabled/enabled.
It has maximum printing speed 500mm/s. Wow. I can do a print using only HALF the time needed than using Ender 3 stock model.
Screenshot below is a bird feeder house just finished.
It took 5h 54m to complete.
It would take 10h 49m using Ender 3.
Material : 1.75mm PLA filament.
Colour : Brown.
Slicer : Cura 4.9
Cura settings I am using :
Layer Height : 0.2mm
Infill Density : 20%
Printer Temp : 210 C
Bed Temp : 60 C
Printing Speed : 300mm/s
Inner Wall speed : 300mm/s
Outer wall speed : 200mm/s
Initial layer speed : 100mm/s
Top/Bottom speed : 200mm/s
Cooling : 100%
Retraction : 0.8mm at 40 mm/s
Support : NO
Last edited:

.jpg")